[SpringBoot + Kotlin] KaKao & Google OAuth Login web service
Updated:
[SpringBoot + Kotlin] KaKao & Google OAuth Login web service
사전 설명
KaKao와 Google의 Oauth 기능을 사용하여 로그인을 구현하고 사용자 정보를 DB에 저장하는 것 까지 해보겠습니다.
이 포스트는 Spring web server로 Oauth의 로그인 창을 띄우고 access token을 발급, 회원 정보를 가져오는 모든 기능을 수행하는 것입니다.
프론트에서 access token을 받아 Oauth를 통해 로그인을 처리하는 것은 다음 포스트에서 진행 될 예정입니다.
사전 작업
구글과 카카오의 Oauth api을 사용하기 위해서는 각 서비스의 OAuth 서비스 등록이 필요합니다.
해당 과정은 해당 포스트에 잘 정리되어 있어 구글과 카카오 Oauth 서비스 등록을 참고하시길 바라겠습니다.
그 이외에 참고할 정보는 다음과 같습니다.
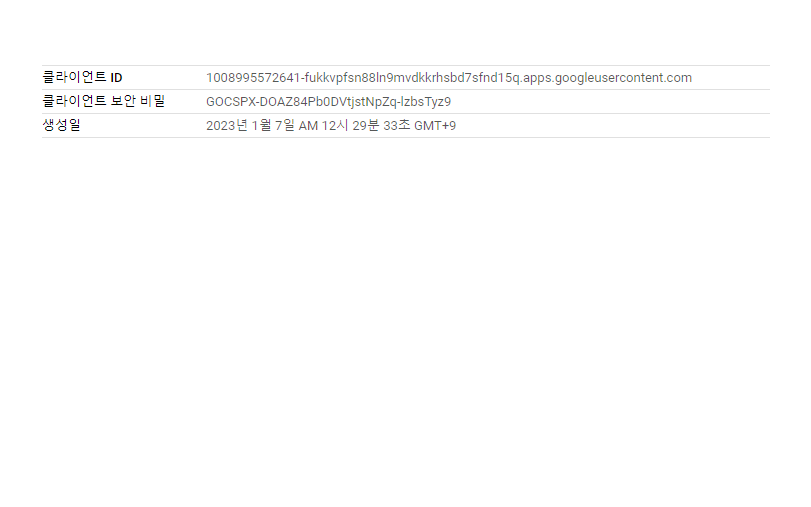
구글
리다이렉트 URL 세팅이 필요합니다.
제가 개발할 당시, port 번호로 인하여 인증이 안되는 오류가 발생하여 리디렉션 URL에 포트가 있는 정보와 없는 정보 전부 넣어주었습니다.
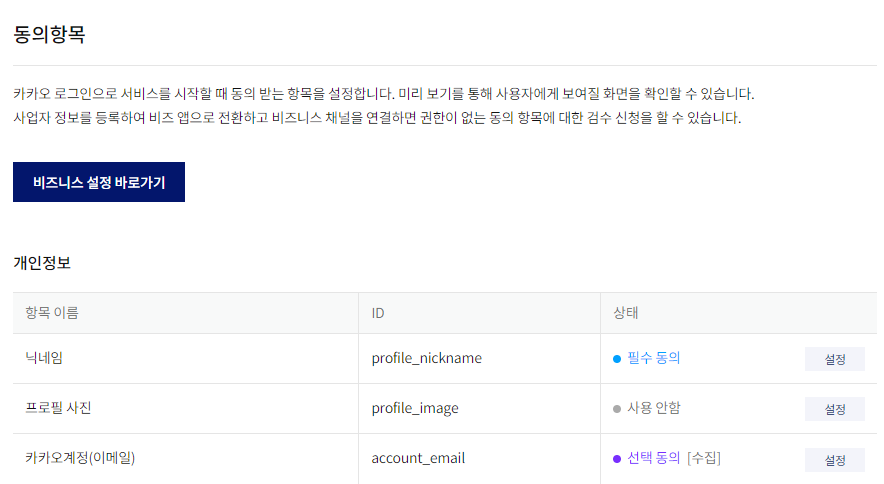
카카오
동의 항목은 닉네임과 이메일을 선택하였습니다.
해당 동의항목 외 다른 동의항목을 선택하면 CustomOAuth2Provider의 scope()에 추가가 필요합니다.
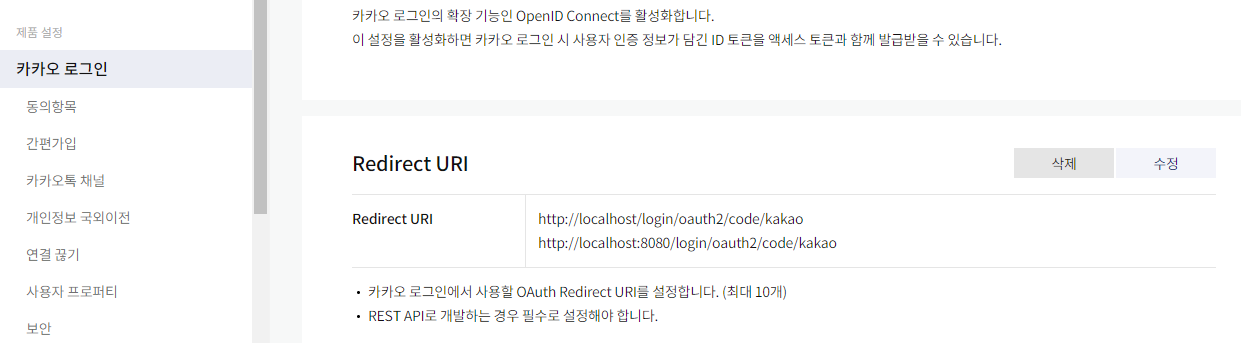
카카오의 리다이렉트 URL도 다음과 같이 세팅 해줍니다.
코드
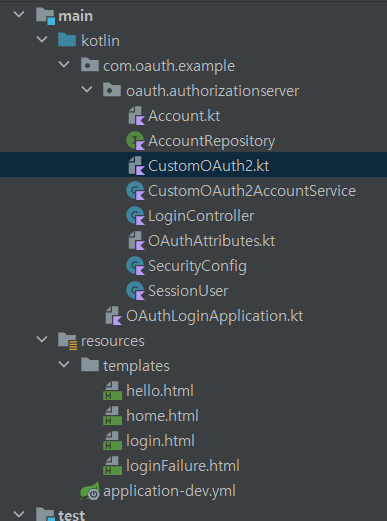
프로젝트 구조는 다음과 같습니다.
build.gradle.kt
디펜던시는 다음과 같이 세팅합니다.
dependencies {
    implementation("org.springframework.boot:spring-boot-starter-oauth2-client")
    implementation("org.springframework.boot:spring-boot-starter-security")
    implementation("org.springframework.boot:spring-boot-starter-thymeleaf")
    implementation("org.springframework.boot:spring-boot-starter-web")
    implementation("com.fasterxml.jackson.module:jackson-module-kotlin")
    implementation("org.jetbrains.kotlin:kotlin-stdlib-jdk8")
    implementation("org.jetbrains.kotlin:kotlin-reflect")
    testImplementation("org.springframework.boot:spring-boot-starter-test")
    testImplementation("org.springframework.security:spring-security-test")

    // db
    runtimeOnly("com.h2database:h2")
    implementation("org.postgresql:postgresql:42.5.1")
    runtimeOnly("org.postgresql:postgresql") // 추가
    implementation("org.springframework.boot:spring-boot-starter-data-jdbc")
    implementation("org.springframework.boot:spring-boot-starter-data-jpa")
    implementation("org.springframework.boot:spring-boot-starter-jdbc")
}
application.yml
Spring boot에서 사용되는 프로퍼티들이 입력되는 파일입니다.
Google OAuth2에서 기본적으로 제공해주는 관련 프로퍼티는 spring.security.oauth2.client.registration의 하위 설정에 추가하면 되며,
개별 API ID와 개별 secret은 각자 등록한 API에서 복사하면 됩니다.
spring:
  config:
    activate:
      on-profile: dev
  output:
    ansi:
      enabled: always
  datasource:
    url: jdbc:postgresql://localhost:5432/webflux
    username: { db id }
    password: { db password }
    driver-class-name: org.postgresql.Driver
  jpa:
    open-in-view: false
    hibernate:
      ddl-auto: create
    show-sql: true
    properties:
      hibernate.format_sql: true
      hibernate.enable_lazy_load_no_trans: true
      hibernate:
        show_sql: true
    database: postgresql
  security:
    oauth2:
      client:
        registration:
          google:
            client-id: { google client id }
            client-secret: { google secret }
            scope: profile,email
  main:
    allow-circular-references: true

server:
  port: 8080
  error:
    include-message: always
  shutdown: graceful
SecurityConfig
해당 파일에서는 스프링 시큐리티 설정과 OAuth2 기능을 시큐리티에 적용하는 기능이 작성되어 있습니다.
코드 중간에 카카오 소셜 설정을 위해 client ID와 secret을 등록하는 부분이 있습니다.
각자의 카카오 서비스의 RestAPI와 secret을 등록하시면 됩니다.
registrations.add(
    CustomOAuth2Provider.KAKAO.getBuilder("kakao")
        .clientId("put client id")   // 카카오 oauth의 client id (restful id)
        .clientSecret("put secret") // 카카오 oauth의 secret pw
        .jwkSetUri("temp")
        .build());
전체 코드는 다음과 같습니다.
package com.oauth.example.oauth.authorizationserver

import org.springframework.beans.factory.annotation.Autowired
import org.springframework.boot.autoconfigure.security.oauth2.client.OAuth2ClientProperties
import org.springframework.context.annotation.Bean
import org.springframework.context.annotation.Configuration
import org.springframework.security.config.annotation.web.builders.HttpSecurity
import org.springframework.security.config.annotation.web.configuration.EnableWebSecurity
import org.springframework.security.config.annotation.web.configuration.WebSecurityConfigurerAdapter
import org.springframework.security.config.oauth2.client.CommonOAuth2Provider
import org.springframework.security.oauth2.client.registration.ClientRegistration
import org.springframework.security.oauth2.client.registration.InMemoryClientRegistrationRepository
import org.springframework.security.web.authentication.LoginUrlAuthenticationEntryPoint
import org.springframework.security.web.csrf.CsrfFilter
import org.springframework.web.filter.CharacterEncodingFilter

/**
 * 스프링 시큐리티 관련 설정입니다.
 */
@Configuration
@EnableWebSecurity
class SecurityConfig(
    @Autowired private val customOAuth2AccountService: CustomOAuth2AccountService
) : WebSecurityConfigurerAdapter() {

    override fun configure(http: HttpSecurity) {

        http
            // OAuth2 적용 관련 설정입니다.
            .addFilterAt(CharacterEncodingFilter(), CsrfFilter::class.java)
            .csrf().disable()
            // URI 접근과 관련된 설정입니다.
            .authorizeRequests()
            // 아래 url으로만 접근 가능하도록 세팅
            .antMatchers("/", "/login/**", "/oauth2/**", "/images/**", "/api/login/**").permitAll()
            .anyRequest().authenticated()

            // Iframe 사용 허용합니다.
            .and()
            .headers().frameOptions().disable()

            // 인증되지 않은 사용자를 원하는 페이지로 이동시킵니다.
            .and()
            .exceptionHandling()
            .authenticationEntryPoint(LoginUrlAuthenticationEntryPoint("/login"))

            // 로그인 인증 후 이동 페이지 설정입니다.
            .and()
            .formLogin()
            .successForwardUrl("/welcome")

            // 로그아웃과 관련한 설정입니다.
            .and()
            .logout()
            .logoutUrl("/logout")
            .logoutSuccessUrl("/login")
            .deleteCookies("JSESSIONID")
            .invalidateHttpSession(true)

            .and()
            .oauth2Login()
            .defaultSuccessUrl("/login/complelte")
            .userInfoEndpoint() // userInfo Endpoint, 즉 로그인 성공 후에 관하여 설정
            .userService(customOAuth2AccountService) // 로그인 성공후에 사용할 Service 등록

    }

    /**
     * OAuth2 설정입니다.
     */
    @Bean
    fun clientRegistrationRepository(oAuth2ClientProperties: OAuth2ClientProperties,
    ): InMemoryClientRegistrationRepository {

        // 소셜 설정 등록
        val registrations = oAuth2ClientProperties.registration.keys
            .map { getRegistration(oAuth2ClientProperties, it) }
            .filter { it != null }
            .toMutableList()
        // 카카오 소셜 설정 등록
        registrations.add(
            CustomOAuth2Provider.KAKAO.getBuilder("kakao")
                .clientId("put client id")   // 카카오 oauth의 client id (restful id)
                .clientSecret("put secret") // 카카오 oauth의 secret pw
                .jwkSetUri("temp")
                .build());

        return InMemoryClientRegistrationRepository(registrations)
    }

    // 공통 소셜 설정을 호출합니다.
    private fun getRegistration(clientProperties: OAuth2ClientProperties, client: String): ClientRegistration? {
        val registration = clientProperties.registration[client]
        return when(client) {
            "google" -> CommonOAuth2Provider.GOOGLE.getBuilder(client)
                .clientId(registration?.clientId)
                .clientSecret(registration?.clientSecret)
                .scope("email", "profile")
                .build()
            else -> null
        }
    }
}
CustomOAuth2.kt
KAKAO을 위한 provider입니다.
oauth 권한 token, access token, 유저 정보를 받아올 url을 세팅해주며,
동의를 받을 권한 목록을 세팅해줍니다.
package com.oauth.example.oauth.authorizationserver

import org.springframework.security.oauth2.client.registration.ClientRegistration
import org.springframework.security.oauth2.core.AuthorizationGrantType
import org.springframework.security.oauth2.core.ClientAuthenticationMethod

/**
 * 커스텀 소셜 Provider
 */
enum class CustomOAuth2Provider {
    KAKAO {
        override fun getBuilder(registrationId: String) =
            getBuilder(registrationId, ClientAuthenticationMethod.POST, DEFAULT_LOGIN_REDIRECT_URL)
                .scope("account_email", "profile_nickname")
                .authorizationUri("https://kauth.kakao.com/oauth/authorize")
                .tokenUri("https://kauth.kakao.com/oauth/token")
                .userInfoUri("https://kapi.kakao.com/v2/user/me")       // 발급받은 access token으로 user 정보를 받기위한 url
                .userNameAttributeName("id")
                .clientName("Kakao")
    },
    NAVER {     // 네이버는 사용 x
        override fun getBuilder(registrationId: String) =
            getBuilder(registrationId, ClientAuthenticationMethod.POST, DEFAULT_LOGIN_REDIRECT_URL)
                .scope("profile")
                .authorizationUri("https://nid.naver.com/oauth2.0/authorize")
                .tokenUri("https://nid.naver.com/oauth2.0/token")
                .userInfoUri("https://openapi.naver.com/v1/nid/me")
                .userNameAttributeName("response")
                .clientName("Naver")
    };

    companion object {
        val DEFAULT_LOGIN_REDIRECT_URL = "{baseUrl}/login/oauth2/code/{registrationId}"
    }

    protected fun getBuilder(registrationId: String, method: ClientAuthenticationMethod, redirectUri: String) =
        ClientRegistration.withRegistrationId(registrationId)
            .clientAuthenticationMethod(method)
            .authorizationGrantType(AuthorizationGrantType.AUTHORIZATION_CODE)
            .redirectUriTemplate(redirectUri)

    abstract fun getBuilder(registrationId: String): ClientRegistration.Builder
}
CustomOAuth2AccountService
Google 및 Kakao 로그인하여 access token을 받은 뒤, 후처리를 담당하는 service 입니다.
- access token으로 유저 정보 요청
- 받아온 정보로 부터 필요한 정보(email, nickname)을 뽑아
OAuthAttributes에 저장 - 세션 등록
- 회원 정보 db 저장
와 같은 동작을 수행합니다.
userRequest: OAuth2UserRequest은 access token과 유저 정보를 받아올 url 등, 로그인 후 oauth 서비스로 부터 받아온 정보를 담고 있습니다.
package com.oauth.example.oauth.authorizationserver

import org.springframework.security.core.authority.SimpleGrantedAuthority
import org.springframework.security.oauth2.client.userinfo.DefaultOAuth2UserService
import org.springframework.security.oauth2.client.userinfo.OAuth2UserRequest
import org.springframework.security.oauth2.client.userinfo.OAuth2UserService
import org.springframework.security.oauth2.core.OAuth2AuthenticationException
import org.springframework.security.oauth2.core.user.DefaultOAuth2User
import org.springframework.security.oauth2.core.user.OAuth2User
import org.springframework.stereotype.Service
import javax.servlet.http.HttpSession

@Service
class CustomOAuth2AccountService(private val accountRepository: AccountRepository,
                                 private val httpSession: HttpSession
): OAuth2UserService<OAuth2UserRequest, OAuth2User> {
    override fun loadUser(userRequest: OAuth2UserRequest?): OAuth2User {
        if (userRequest == null) throw OAuth2AuthenticationException("Error")
        println("hi")
        // registrationId는 로그인 진행중인 서비스 코드
        // 구글, 카카오등을 구분
        val registrationId = userRequest.clientRegistration.registrationId

        //if(registrationId == "google"){
        val delegate = DefaultOAuth2UserService()
        // 받은 access token으로 user 정보를 요청하여 받아온다.
        val oAuth2User = delegate.loadUser(userRequest)

        // OAuth2 로그인 진행시 키가 되는 필드값
        val userNameAttributeName = userRequest.clientRegistration.providerDetails.userInfoEndpoint.userNameAttributeName

        // OAuth2User의 attribute가 된다.
        // 추후 다른 소셜 로그인도 이 클래스를 쓰게 될 것이다.
        lateinit var attributes: OAuthAttributes
        // 구글의 경우
        if(registrationId == "google"){
            attributes = OAuthAttributes.of(
                registrationId,
                userNameAttributeName,
                oAuth2User.attributes
            )
        }
        else{   // 카카오의 경우
            val kakaoUserInfo = mutableMapOf<String, Any>()
            val kakaoMap = oAuth2User.attributes["kakao_account"] as Map<*, *>

            val kakapProfile = kakaoMap["profile"] as Map<*, *>
            kakapProfile["nickname"]?.let { kakaoUserInfo.put("name", it) }
            kakaoMap["email"]?.let {kakaoUserInfo.put("email", it)}
            oAuth2User.attributes["id"]?.let { kakaoUserInfo.put("id", it) }

            attributes = OAuthAttributes.of(
                registrationId,
                userNameAttributeName,
                kakaoUserInfo
            )
        }

        // 전달받은 OAuth2User의 attribute를 이용하여 회원가입 및 수정의 역할을 한다.
        // User Entity 생성 : 회원가입
        // User Entity 수정 : update
        val user = saveOrUpdate(attributes)
        println(user)
        // session에 SessionUser(user의 정보를 담는 객체)를 담아 저장한다.
        httpSession.setAttribute("user", SessionUser(user))

        return DefaultOAuth2User(
            setOf(SimpleGrantedAuthority(user.role.key)),
            attributes.attributes,
            attributes.nameAttributeKey
        )
    }

    fun saveOrUpdate(attributes: OAuthAttributes): Account {
        val user = accountRepository.findByEmail(attributes.email)
            ?.copy(name = attributes.name)
            ?: attributes.toEntity()

        return accountRepository.save(user)
    }
}
LoginController
로그인을 담당하는 컨트롤러 입니다.
fun home 에서 세션 정보 유무에 따라 로그인을 할지, 구분합니다.
package com.oauth.example.oauth.authorizationserver

import org.springframework.stereotype.Controller
import org.springframework.ui.Model
import org.springframework.web.bind.annotation.*
import javax.servlet.http.HttpSession

@Controller
class LoginController(
    private val httpSession: HttpSession
) {
    // index페이지 호출 시 로그인 페이지로 이동
    @GetMapping("/")
    fun home(model: Model): String {
        model.addAttribute("hi", "hi")
        val user = httpSession.getAttribute("user") as SessionUser?

        // 세션정보가 이미 있을 시
        if (user != null) {
            model.addAttribute("user", user)    // 세션에 저장된 user 정보를 view에 전달한다.
            return "redirect:/welcome"
        }
        println("hello everyone")
        return "redirect:/login"
    }

    // 로그인 페이지
    @GetMapping("/login")
    fun login() = "login"

    // 로그인 성공 URI
    @GetMapping("/login/complelte")
    fun loginComplete() = "redirect:/welcome"

    // 로그인 후 웰컴 페이지 (인증 후 접근 가능)
    @GetMapping("/welcome")
    @ResponseBody
    fun welcome() = "Hello! Social Login!!"
}
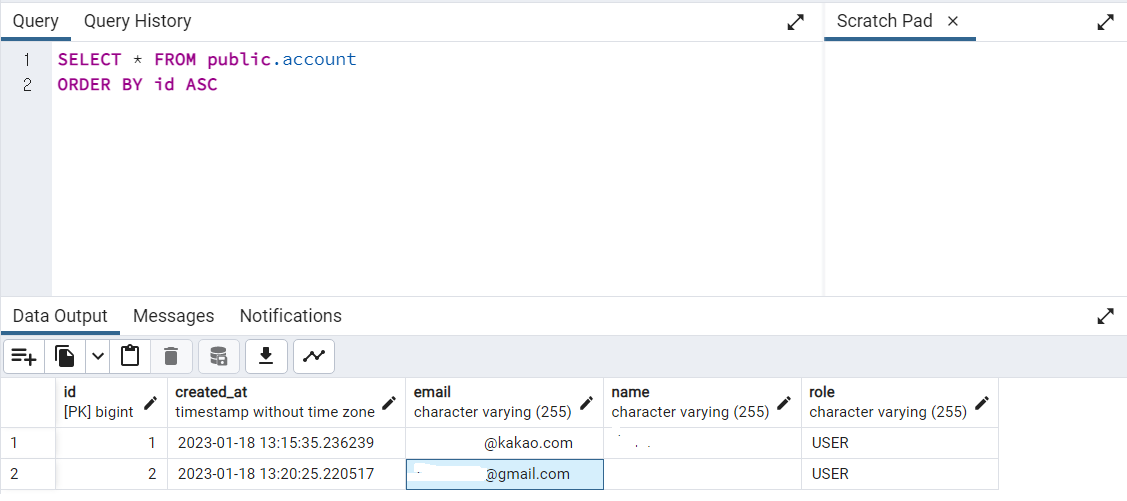
결과
구글, 카카오 로그인을 성공하면, db에 각 서비스에 등록된 이름(닉네임), 이메일을 받아와 저장합니다.
전체 코드
마지막으로 서비스를 구현한 전체 프로젝트 입니다. OAuthLogin Example
출처
[Spring boot + Kotlin] OAuth2를 이용한 Social Login
[Spring Boot] OAuth2 소셜 로그인 가이드 (구글, 페이스북, 네이버, 카카오)
